
Extract maximum nutrients and flavor with our traditional simmering method.
Quick Summary / Key Takeaways
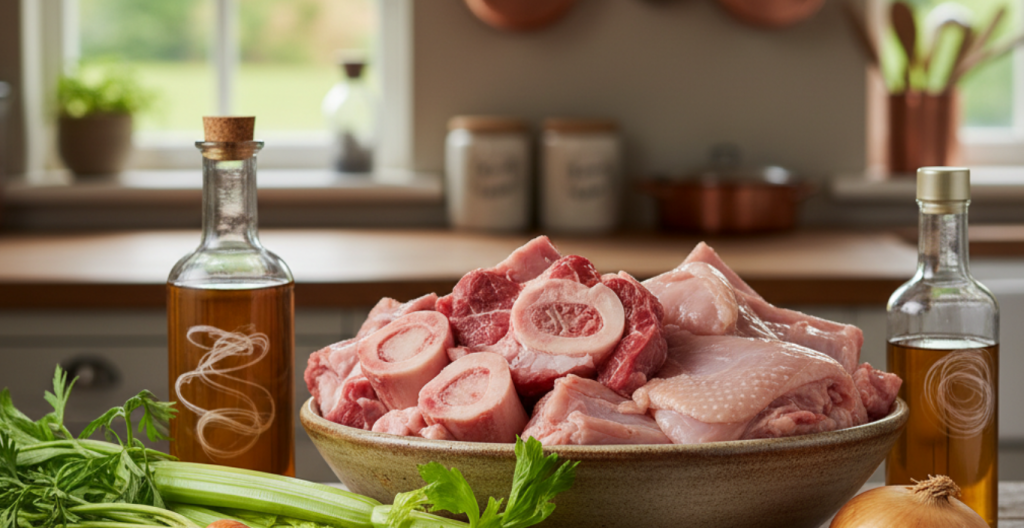
- Use collagen-rich bones such as knuckles, joints, feet, or necks. These cuts contain connective tissue that breaks down into gelatin during long simmering, which is why properly made bone broth often firms up when chilled.
- Add a small splash of apple cider vinegar before simmering. About one to two tablespoons in a large pot helps create a mildly acidic environment that supports the extraction of minerals and collagen compounds from the bones during the cooking process.
- Roasting bones at about 400°F before simmering deepens flavor. This step is optional, but browning the bones in the oven helps develop a richer taste and darker color in the finished bone broth.
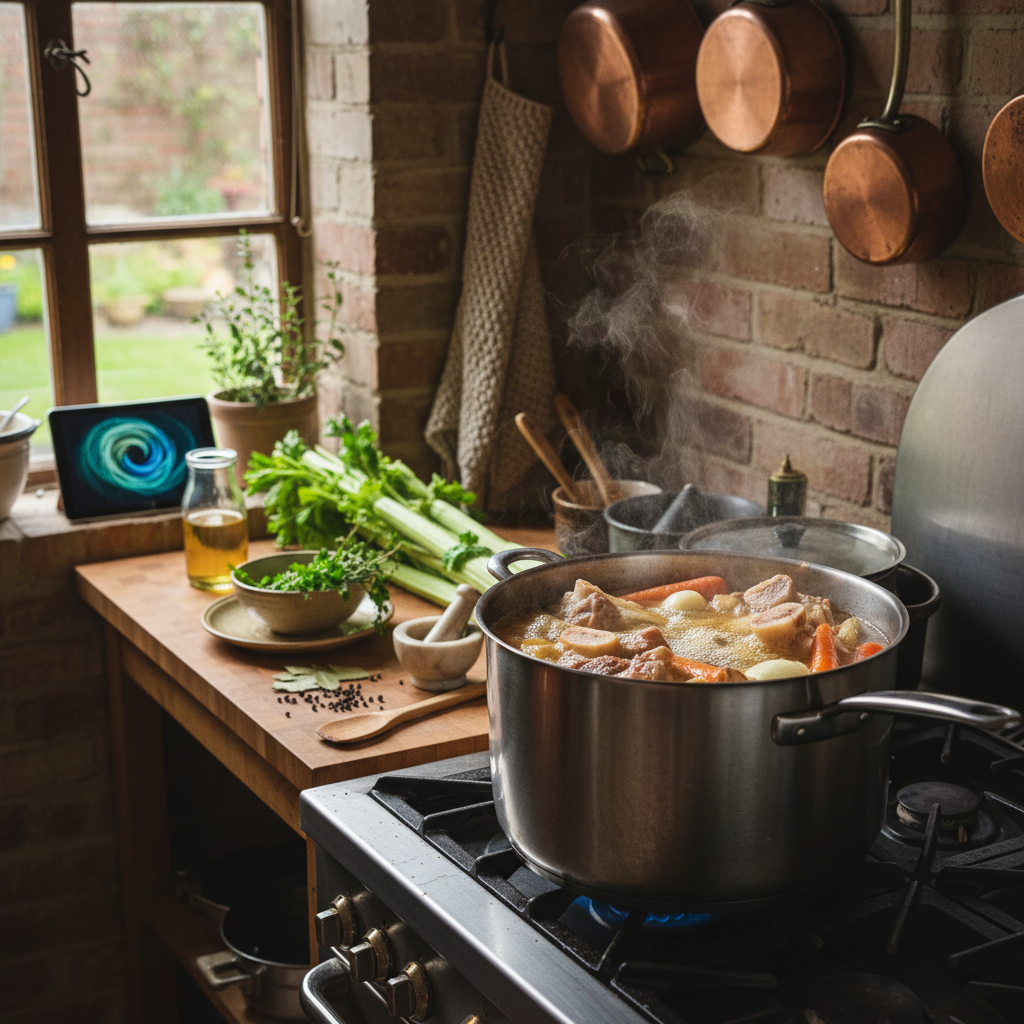
- Keep the broth at a very gentle simmer. You want only occasional bubbles breaking the surface. A low simmer helps keep the broth clear and allows collagen to slowly dissolve into the liquid.
- Bone broth is a practical way to use bones and kitchen leftovers. Many people make it from leftover roasted chicken carcasses or beef bones, creating a flavorful base for soups, grains, sauces, or simply a warm cup of broth.
Introduction
Most bone broth brands jump straight to selling the product. We take a different approach. We believe people should understand what bone broth is, how it works, and how to make it properly before anything else. That means explaining the role of collagen-rich bones, long simmering, and simple ingredients so you can get real results in your own kitchen.
Bone broth itself is nothing complicated. It is made by slowly simmering bones and connective tissue in water for an extended period, allowing collagen to break down into gelatin along with naturally occurring amino acids like glycine and proline. This long extraction is what gives bone broth its deeper body compared with quick stocks. It is also one of the most practical ways to use leftover bones from roasted chicken, beef joints, or other cuts that still contain cartilage and connective tissue.
In this guide, we will walk through the step-by-step process of making bone broth at home, from choosing the right bones and roasting them for flavor to maintaining the right simmer and storing the finished broth. If you want to understand bone broth beyond the basics, this is exactly the kind of process we focus on at BoneBroth Co. Real broth starts with the fundamentals, and once you understand them, making it at home becomes straightforward.
Choosing Bones for Homemade Bone Broth (Collagen and Flavor Guide)
| Bone Source | Collagen Potential | Flavor Profile | Best Use in Homemade Bone Broth |
|---|---|---|---|
| Beef Knuckles | Very High | Mild, beefy richness | Helps create gelatin structure in long-simmered broth |
| Chicken Feet | Extremely High | Neutral | Boosts gelatin and body in chicken bone broth |
| Marrow Bones | Moderate | Deep, nutty, rich | Adds depth of flavor but should be combined with joint bones |
| Oxtail | High | Beefy and savory | Produces rich broth often used for sipping or soups |
Cooking Methods and Typical Simmer Times for Homemade Bone Broth
| Cooking Method | Typical Cook Time | Heat Level | Why People Use It |
|---|---|---|---|
| Slow Cooker | 18–24 hours | Low | Hands-off cooking for long simmering |
| Stovetop Pot | 12–24 hours | Gentle simmer | Easy to monitor and adjust heat |
| Pressure Cooker | 2–4 hours | High pressure | Faster extraction of gelatin and flavor |
| Multi Cooker | 12–24 hours | Low simmer setting | Flexible appliance with controlled temperature |
Bone Broth Cooking Setup Checklist (Before You Start)
- Source collagen-rich bones from a reliable butcher or farmer. Look for grass-fed or pasture-raised bones when possible, especially cuts like knuckles, joints, necks, or feet that contain more connective tissue.
- Roast bones at about 400°F for roughly 30 minutes if you want deeper flavor. This step is optional but helps develop a richer color and more complex taste in the finished broth.
- Prepare simple aromatics such as carrots, celery, onion, or garlic. These ingredients are not required, but they add balance and depth to homemade bone broth.
- Set up your cooking equipment. A large stockpot, slow cooker, or similar pot that can maintain a gentle simmer works well for long cooking times.
Bone Broth Finishing and Storage Checklist (After Cooking)
- Strain the finished broth through a fine-mesh sieve or cheesecloth. This removes small bone fragments, vegetables, and impurities from the liquid.
- Cool the broth before storing. Let the broth cool slightly, then refrigerate it so it passes through the food-safety temperature range quickly.
- Remove the fat layer after chilling if desired. Once the broth cools in the refrigerator, the fat will rise and solidify on top, making it easy to skim or save for cooking.
- Store the broth in airtight containers. Homemade bone broth typically keeps about five days in the refrigerator, or it can be frozen for longer storage.
Table of Contents

Section 1: CHOOSING INGREDIENTS FOR HOMEMADE BONE BROTH
Section 2: PREPARING AND COOKING BONE BROTH
Section 3: COMMON BONE BROTH MISTAKES AND TROUBLESHOOTING
Section 4: STORING AND USING HOMEMADE BONE BROTH
Frequently Asked Questions
Section 1: CHOOSING INGREDIENTS FOR HOMEMADE BONE BROTH
FAQ 1: What are the best bones for making bone broth?
The best bones for making bone broth are those rich in connective tissue, such as knuckles, joints, feet, necks, and backs. These parts contain collagen that breaks down into gelatin during long simmering, which gives bone broth its thicker body and the gel texture many people look for when it cools. Marrow bones can also be added because they contribute flavor and nutrients, but they produce less gelatin on their own.
For a balanced broth, it helps to combine collagen-rich joint bones with marrow bones. Many home cooks also use leftover chicken carcasses from roasted birds since they still contain cartilage and connective tissue that support gelatin formation during slow simmering.
FAQ 2: Why do you add vinegar to the pot?
When making bone broth at home, we usually add a small amount of apple cider vinegar to the pot before simmering. The mild acidity helps break down cartilage and connective tissue so minerals and collagen-derived compounds can move into the liquid more easily during long cooking. It’s a simple step used in many traditional broth recipes, especially when simmering bones for 12–24 hours.
You don’t need much. About one to two tablespoons of apple cider vinegar for a large pot is usually enough. After hours of slow simmering, the vinegar flavor doesn’t stand out in the finished broth. What it does instead is support better extraction from the bones, which is part of why properly made bone broth develops a richer body and nutrient profile.
Section 2: PREPARING AND COOKING BONE BROTH
FAQ 3: Should I roast the bones before simmering?
Roasting the bones before simmering is a common step when making bone broth at home because it deepens flavor and gives the broth a richer color. Placing the bones in the oven at around 400°F until browned helps caramelize the natural proteins and fats on the surface. When those roasted bones are later simmered for many hours, they contribute a fuller, more savory broth. This step is especially useful when working with beef bones or mixed bones, where a stronger flavor is usually preferred.
That said, roasting is optional. If you’re making a lighter chicken bone broth, many people skip this step and simmer the bones directly. What matters most for bone broth is the long, slow simmer, which allows collagen from connective tissue to gradually dissolve into the liquid and give the broth its characteristic body.
FAQ 4: How long does homemade bone broth need to cook?
Homemade bone broth is typically simmered for a long period so collagen and other compounds from the bones and connective tissue have time to dissolve into the liquid. In most home kitchens, chicken bones are usually simmered for about 12 to 15 hours, while beef bones often need closer to 18 to 24 hours because they are denser. The key is keeping the pot at a very gentle simmer, where only a few bubbles rise to the surface occasionally. This slow cooking is what helps develop the broth’s body and flavor.
Many people use a slow cooker or low stove setting to manage these long cooking times safely without constant supervision. The goal isn’t aggressive boiling but steady, low heat over many hours. That approach allows the broth to gradually extract gelatin and amino acids from the bones, which is what gives traditional bone broth its richer texture compared with a quick stock.
Section 3: COMMON BONE BROTH MISTAKES AND TROUBLESHOOTING
FAQ 5: Why did my bone broth not turn into jelly?
If your bone broth stays liquid after cooling, it usually means the broth didn’t extract enough gelatin from the bones. This often happens when the pot contains too much water or not enough collagen-rich bones such as joints, knuckles, or feet. Gelatin is what gives properly made bone broth its characteristic jiggle once chilled, and it forms when collagen from connective tissue breaks down during long simmering. For better results, keep the water level just high enough to cover the bones and include plenty of connective-tissue cuts in your mix.
Another factor is simmer time. Bone broth needs a long, gentle simmer so collagen has time to dissolve into the liquid. If your broth didn’t gel, you can sometimes continue simmering it longer to concentrate the gelatin. It’s also worth remembering that gel texture is a helpful indicator of extraction, but even broth that doesn’t fully set can still be useful for cooking soups, sauces, or grains.
FAQ 6: Can you reuse bones for a second batch?
Yes, bones can be reused for a second batch of bone broth, and this is a common practice in traditional kitchens. After straining your first pot of bone broth, you can add fresh water and aromatics and simmer the same bones again. The second batch will usually be lighter in flavor and body because much of the collagen and gelatin were already extracted during the first long simmer, but it can still work well for everyday cooking.
We often suggest using this second broth for practical things like cooking grains, beans, soups, or sauces, where a lighter base still adds depth compared with plain water. Just keep expectations realistic. The first batch is where most of the gelatin extraction happens, especially when using collagen-rich bones like joints and knuckles.
Section 4: STORING AND USING HOMEMADE BONE BROTH
FAQ 7: How do I store and freeze bone broth safely?
After making bone broth at home, let it cool slightly and then store it in airtight glass jars or containers in the refrigerator for up to about five days. If you want to keep it longer, freezing is the most reliable option. When freezing bone broth in glass jars, leave at least one inch of headspace at the top so the liquid can expand as it freezes. This helps prevent the jar from cracking.
For everyday cooking, another practical option is freezing bone broth in ice cube trays or small silicone molds. Once frozen, you can transfer the cubes to a freezer bag and use them as needed for soups, sauces, grains, or quick meals. Portioning it this way makes it easier to add small amounts of bone broth to recipes without thawing a full container.
FAQ 8: What is the difference between stock and bone broth?
The main difference between stock and bone broth comes down to cook time and purpose. Traditional stock is usually simmered for about four to six hours and is primarily used as a base for soups, sauces, and stews. Bone broth is simmered much longer, often around 12 to 24 hours depending on the type of bones. This longer simmer allows collagen from connective tissue to gradually break down into gelatin, which gives bone broth a fuller body and the gel-like texture it often develops when chilled.
Bone broth is also typically made with more collagen-rich bones such as joints, knuckles, or feet. Because of that longer extraction, many people drink bone broth on its own as well as use it in cooking. Stock and bone broth share similar ingredients, but bone broth focuses more on slow extraction from connective tissue while stock is generally prepared as a quicker cooking base.
Ready to try real bone broth that’s made the way we teach it?
Our formula was built around the research you just read. No shortcuts. No fillers. Just nutrient-rich broth that works.